For some time I've been fascinated by the marked temperature differences over short distances I can feel when swimming at the beach or on the reef. This clearly happens at scales that are far too small to be detected by satellite imaging sensors. As I'm also interested in coral reef dynamics, I am curious to know just how these fine scale variations may play a part in affecting coral health. Temperature loggers are one way to look at this, but they are always going to represent discrete points compared to an imaging sensor that can measure a continuous surface. An airborne thermal imaging sensor is therefore the only way that I can start to investigate this matter.
Recently, a couple of miniaturised thermal sensors have come onto the market and are light enough to be carried by off-the-shelf drones. I've been dabbling with drones for a couple of years now, so it seemed the right time to see where I could take this. Last week I had the opportunity to test the FLIR Vue Pro on Orpheus Island, Great Barrier Reef, and here's what I found.
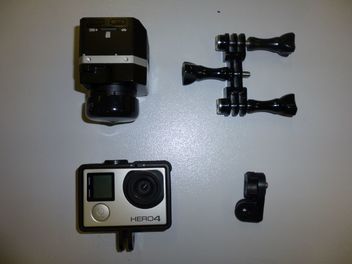
Firstly, here's my equipment:
Power supply
The first thing to note is that the FVP does not come with a power supply or battery, just a mini USB input cable. So obviously to use it, you need to have a way to power it. Mains power is clearly restrictive, but is fine for getting familiar with the camera. For a mobile option, I bought a USB power pack ($30). At 80 grams, this could be attached to the drone, but it's still a lot of unnecessary weight. Luckily the 3DR Solo has an accessory bay that's built for exactly this sort of thing. For the lighter option of 65g, a colleague made me a mini USB connector that also includes navigation lights for the Solo (it's severely lacking in this regard, and I plan to fly at night). We have some work to do in giving this some finesse especially as we weren't sure how long the USB cable needed, but at least we now have power to the camera.
Attachment / Mounting
How to mount the camera was the next main decision. It comes with a GoPro attachment ring / collar that fits under the lens. This is fine if you want to mount it on the Solo facing forward, but for mapping purposes it doesn't provide enough clearance from the hull. I opted instead to use a tripod-to-GoPro adaptor which then allowed the necessary clearance. Unfortunately when every gram counts I'd rather not have this added weight, but short of building a specific mount with not enough time, this will do the job.
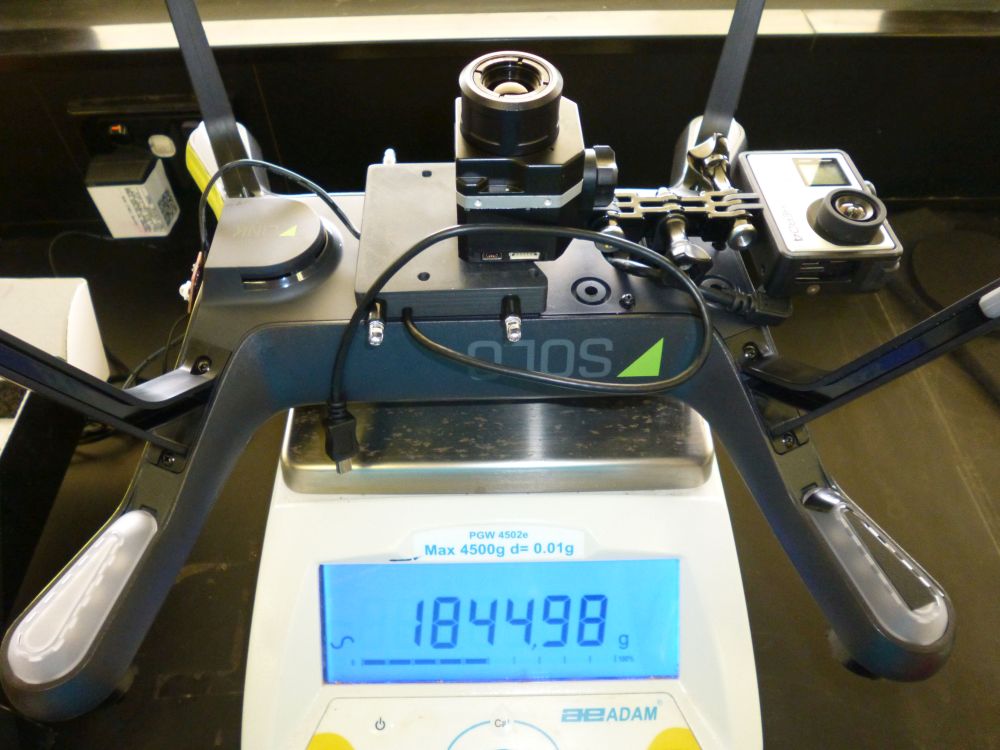
Next I wanted to see if I could fly both the GoPro and the FVP at the same time. To do this, I bought a dual mount and fitted the GoPro to the front of the craft while the slightly heavier FVP was closer to the centre of gravity. Taking care to use the shortest GoPro connector screws possible, this complete set up (including lights) weighed 1.84kg, just 20g more than the standard gimbal + GoPro configuration. This is still within the expected MTOW of the craft. I can fly this set up in the hot and humid tropics for approximately 12 mins, while retaining at least 20% battery at the end of the flight.
Recently, a couple of miniaturised thermal sensors have come onto the market and are light enough to be carried by off-the-shelf drones. I've been dabbling with drones for a couple of years now, so it seemed the right time to see where I could take this. Last week I had the opportunity to test the FLIR Vue Pro on Orpheus Island, Great Barrier Reef, and here's what I found.
Firstly, here's my equipment:
- 3DR Solo (see also my thoughts about my first Solo flight)
- FLIR Vue Pro 19 mm lens, 640 x 512 pixel array, 'slow' speed thanks to Tim Snell from IMC
- GoPro Hero 4 Silver modified with 4.35 mm minimal distortion
- Go Pro Dual Mount
- Rugged Troll Thermal loggers
- FLIR Vue Pro App (for android or iOS)
- USB power pack
Power supply
The first thing to note is that the FVP does not come with a power supply or battery, just a mini USB input cable. So obviously to use it, you need to have a way to power it. Mains power is clearly restrictive, but is fine for getting familiar with the camera. For a mobile option, I bought a USB power pack ($30). At 80 grams, this could be attached to the drone, but it's still a lot of unnecessary weight. Luckily the 3DR Solo has an accessory bay that's built for exactly this sort of thing. For the lighter option of 65g, a colleague made me a mini USB connector that also includes navigation lights for the Solo (it's severely lacking in this regard, and I plan to fly at night). We have some work to do in giving this some finesse especially as we weren't sure how long the USB cable needed, but at least we now have power to the camera.
Attachment / Mounting
How to mount the camera was the next main decision. It comes with a GoPro attachment ring / collar that fits under the lens. This is fine if you want to mount it on the Solo facing forward, but for mapping purposes it doesn't provide enough clearance from the hull. I opted instead to use a tripod-to-GoPro adaptor which then allowed the necessary clearance. Unfortunately when every gram counts I'd rather not have this added weight, but short of building a specific mount with not enough time, this will do the job.
Next I wanted to see if I could fly both the GoPro and the FVP at the same time. To do this, I bought a dual mount and fitted the GoPro to the front of the craft while the slightly heavier FVP was closer to the centre of gravity. Taking care to use the shortest GoPro connector screws possible, this complete set up (including lights) weighed 1.84kg, just 20g more than the standard gimbal + GoPro configuration. This is still within the expected MTOW of the craft. I can fly this set up in the hot and humid tropics for approximately 12 mins, while retaining at least 20% battery at the end of the flight.

Controlling the camera
With the hardware largely figured out, software was the next challenge. The FVP App is pretty basic to be honest, but it largely does the job. I was having some troubles with it initially, but an update came out last week that largely solved the issues. I learnt to just ignore its warnings.
Within the App, it's possible to change colour palettes, dynamic range, and output format (jpg or tiff). I use the white hot palette as I'm not concerned about the display, I just want the actual data in the pixels. I can always display it as different colours later if I wish. The app is used to switch between video, image, or time lapse modes. Images can be set to acquire as frequently as 1/sec up to 1/17 secs. Data are written to the 32GB included mini sd card in the camera.
The biggest miss on the app is that there is no live feed of the imagery. This is a real pain when trying to work through the different settings - without the immediate feedback of the effect of a setting change, it's like learning old school photography again and having to wait until your film is developed before you can see the results. There is the facility for a mavlink cable (provided), so a feed should be possible via the drone itself though I didn't test this out as its not a simple plug in.
The App uses bluetooth to connect to the FVP. Once you have the recording started, you can manually switch the blue tooth off. Alternatively, I do like how the Bluetooth automatically disables itself after two minutes of the App being closed so that it cannot otherwise interfere with the flight controller. Yet even with the App closed, the FVP continues to record data and you can see this by a small flashing light on the camera itself.
if you're intending on using Tower or Mission Planner to set up your flights, it's useful to add the FVP camera specs into the software so that footprints and overlaps can be accurately determined. To do this have a look at these instructions, but use the following parameters (note that you will have to change this if you have the smaller format frame):
<Camera>
<name>FLIR Vue Pro 19mm</name>
<flen>19</flen>
<imgh>512</imgh>
<imgw>640</imgw>
<senh>8.7</senh>
<senw>10.88</senw>
</Camera>
Working with the data
Downloading the data is super easy. Simply get a mini SD card adapter and plug it into your computer. My files were all 643KB ea. But that's when things got a little more challenging. I wanted to geotag each image based on the Solo telemetry data. This is usually pretty simple in Mission Planner - at least for my GoPro data. But MP couldn't match the image acquisition times with the GPS data. I suspect it is something to do with the format, as the time stamp on each of the TIFFs looked fine to me. I had to assume that it was auto-syncing with the tablet that I used to control it as I couldn't find a way to otherwise change it. I then tried again to geotag with Geosetter, and that worked so clearly there's nothing wrong with the files, but something wrong with Mission Planner reading their metadata. I also realised that each image actually HAD a geotag initially, but that it was set at 0,0 lat/long. That totally messed up our attempt to mosaic in Photoscan without fixing that first.
Given that the imagery I acquired is not the standard type that Pix4D or Photoscan can easily mosaic (i.e. it's hard to automatically find control points over water) we are certainly having some challenges there. Once I've sorted it all out, I'll post a blog specifically on that.
In the meantime, I am happy that the camera is sensitive to what I need. Early views of the data are really promising!
Calibrating for absolute temperatures
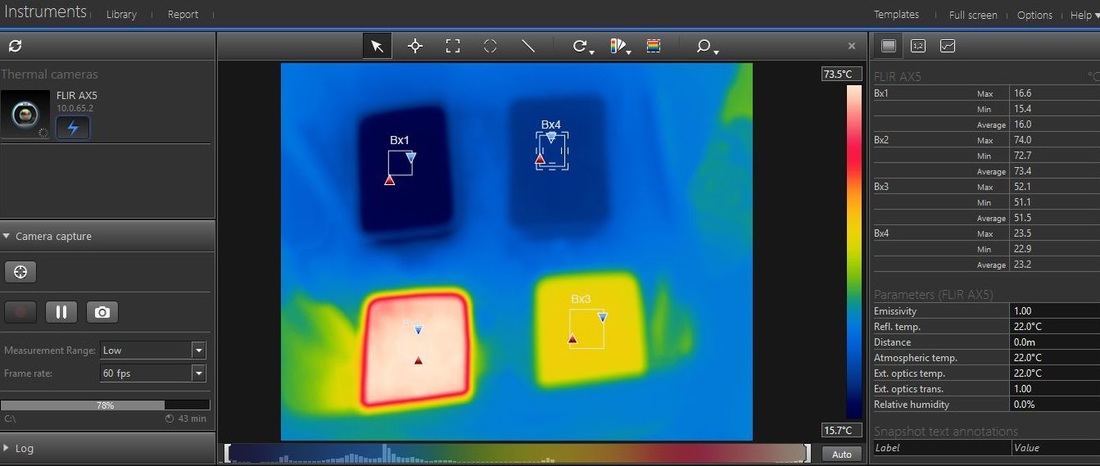
The top of the range FVP is radiometrically calibrated. The one that I received was radiometrically capable but not yet calibrated. Quite a bit cheaper... For many applications, relative temperatures may be just fine, but I wanted absolute. And as I have a fully calibrated FLIR A65, and access to temperature loggers, I performed my own calibration. I used a couple of Chinese takeaway containers filled with iced water, boiling water, and something in between, all inside a black box tucked inside a storage cupboard - somewhat similar to Harry Potter's bedroom - with the lights out. The FLIR sensors are sensitive to reflected light in the 8-14um range as well, so I wanted to get rid of that and only have the emitted temperatures. I used FLIR Tools for the A65 (below) and took photos of the same area with the FVP using the App. I still have to model the correction - another post again!
With the hardware largely figured out, software was the next challenge. The FVP App is pretty basic to be honest, but it largely does the job. I was having some troubles with it initially, but an update came out last week that largely solved the issues. I learnt to just ignore its warnings.
Within the App, it's possible to change colour palettes, dynamic range, and output format (jpg or tiff). I use the white hot palette as I'm not concerned about the display, I just want the actual data in the pixels. I can always display it as different colours later if I wish. The app is used to switch between video, image, or time lapse modes. Images can be set to acquire as frequently as 1/sec up to 1/17 secs. Data are written to the 32GB included mini sd card in the camera.
The biggest miss on the app is that there is no live feed of the imagery. This is a real pain when trying to work through the different settings - without the immediate feedback of the effect of a setting change, it's like learning old school photography again and having to wait until your film is developed before you can see the results. There is the facility for a mavlink cable (provided), so a feed should be possible via the drone itself though I didn't test this out as its not a simple plug in.
The App uses bluetooth to connect to the FVP. Once you have the recording started, you can manually switch the blue tooth off. Alternatively, I do like how the Bluetooth automatically disables itself after two minutes of the App being closed so that it cannot otherwise interfere with the flight controller. Yet even with the App closed, the FVP continues to record data and you can see this by a small flashing light on the camera itself.
if you're intending on using Tower or Mission Planner to set up your flights, it's useful to add the FVP camera specs into the software so that footprints and overlaps can be accurately determined. To do this have a look at these instructions, but use the following parameters (note that you will have to change this if you have the smaller format frame):
<Camera>
<name>FLIR Vue Pro 19mm</name>
<flen>19</flen>
<imgh>512</imgh>
<imgw>640</imgw>
<senh>8.7</senh>
<senw>10.88</senw>
</Camera>
Working with the data
Downloading the data is super easy. Simply get a mini SD card adapter and plug it into your computer. My files were all 643KB ea. But that's when things got a little more challenging. I wanted to geotag each image based on the Solo telemetry data. This is usually pretty simple in Mission Planner - at least for my GoPro data. But MP couldn't match the image acquisition times with the GPS data. I suspect it is something to do with the format, as the time stamp on each of the TIFFs looked fine to me. I had to assume that it was auto-syncing with the tablet that I used to control it as I couldn't find a way to otherwise change it. I then tried again to geotag with Geosetter, and that worked so clearly there's nothing wrong with the files, but something wrong with Mission Planner reading their metadata. I also realised that each image actually HAD a geotag initially, but that it was set at 0,0 lat/long. That totally messed up our attempt to mosaic in Photoscan without fixing that first.
Given that the imagery I acquired is not the standard type that Pix4D or Photoscan can easily mosaic (i.e. it's hard to automatically find control points over water) we are certainly having some challenges there. Once I've sorted it all out, I'll post a blog specifically on that.
In the meantime, I am happy that the camera is sensitive to what I need. Early views of the data are really promising!
Calibrating for absolute temperatures
The top of the range FVP is radiometrically calibrated. The one that I received was radiometrically capable but not yet calibrated. Quite a bit cheaper... For many applications, relative temperatures may be just fine, but I wanted absolute. And as I have a fully calibrated FLIR A65, and access to temperature loggers, I performed my own calibration. I used a couple of Chinese takeaway containers filled with iced water, boiling water, and something in between, all inside a black box tucked inside a storage cupboard - somewhat similar to Harry Potter's bedroom - with the lights out. The FLIR sensors are sensitive to reflected light in the 8-14um range as well, so I wanted to get rid of that and only have the emitted temperatures. I used FLIR Tools for the A65 (below) and took photos of the same area with the FVP using the App. I still have to model the correction - another post again!
 RSS Feed
