KEJOYCE.COM
follow me
  • Home
  • Research
  • Education
  • AWARDS
  • Blog
  • Gallery
  • Contact

Why do I bristle when someone says 'guys'?

26/3/2022

0 Comments

 
I'm not talking about sitting down with these guys, and and saying 'Hi Guys!' I totally don't have a problem with that.
Picture
Scenario 1. I'm in a group that another person addresses collectively as 'guys'. I point out that in fact I'm not a guy. The typical response goes something along the lines of 'haha, you know what I mean'. Yes, I do know what you mean...
Translation: What you mean is - the way that I want to address you is more important than the way you have asked to be addressed.

Scenario 2. While being shown a range of plants at my local nursery, the staff member refers to each new plant as 'this guy'. To be fair, there are some male and female plants, but that's not the point. I asked the staff member 'how do you know they are guys?' Again - 'haha, you know what I mean'. Yes, I do know what you mean.
Translation: What you mean is - the world is for and about men. Women are just a subset of the larger generic group.

So, I'm glad you brought up the idea of women being a subset. Let's look into that! If we just look at the English language (please don't shoot me down for the impact of colonisation here), it's clear that women is actually the more inclusive term, and men is the subset. This holds true for a number of related words: female, woman, she. See - male, man, and he are all subsets.
​

What are the alternatives to saying 'guys'?

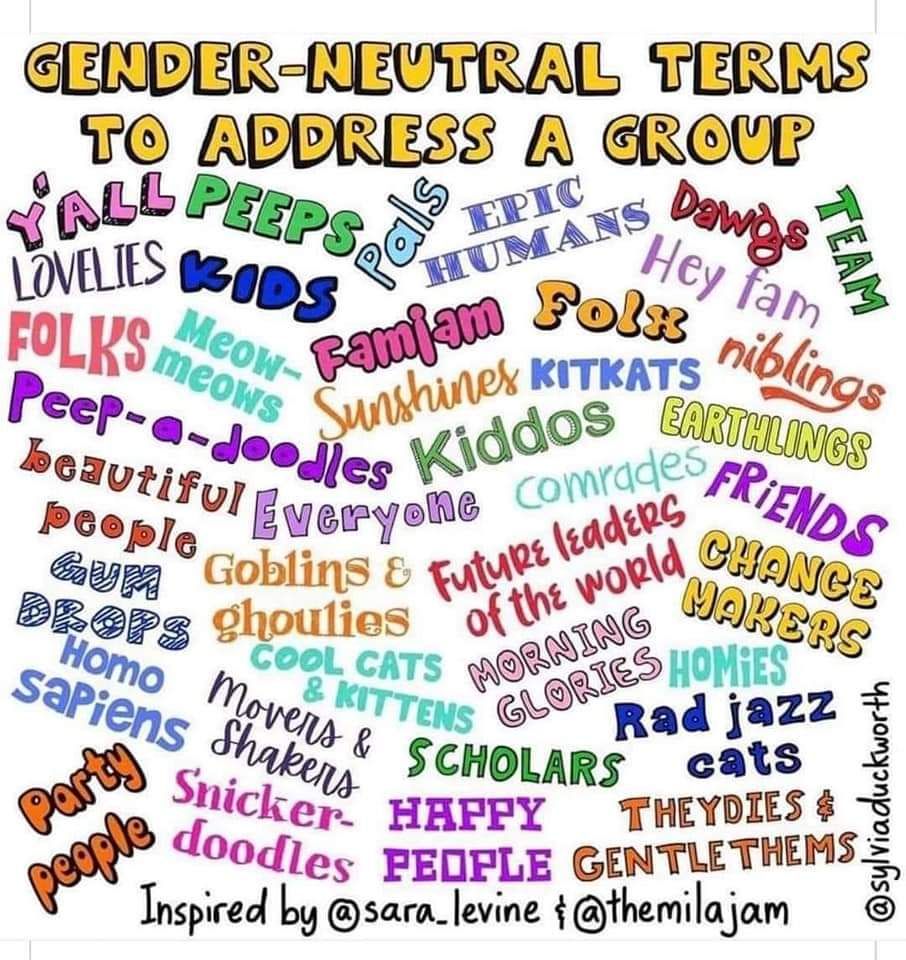
​I love the figure below by @Sylviaduckworth via Twitter for a number of cute alternatives to 'guys'. However I have to say that my number one favourite option is... nothing.

On most occasions where 'guys' is used to address a group of people, it's not necessary to use any word at all! It's redundant.

Try this - instead of saying 'hi guys', just say 'hi'. 
Instead of saying 'alright guys, can I have your attention?', try 'alright, can I have your attention?'
Or instead of 'what are you guys up to?', how about 'what are you up to?'
Picture

But hasn't culture made 'guys' gender neutral?

I challenge anyone to confidently and honestly say that when they close their eyes and imagine 'guys' that they equally imagine women and non-binary people as well as actual guys.

I also question why we as a society expect women and girls to not be offended by being called 'guys', yet also accept that to call boys and men 'girls' would be considered an insult or joke.

Perhaps you could try this for yourself. Next time you address a group of people that are not exclusively girls (i.e. including boys, men, and non-binary people), how about try saying 'hi girls!' Let me know how that goes down.
0 Comments

Will Scicomm kill my career?

15/2/2022

0 Comments

 
Picture
Podcasts, blogs, panels, pechakucha, soapbox science, pint of science, march for science, TEDx, cafe scientifique, webinars, school awards ceremonies, STEM camps, keynotes, media interviews... you name it, and if it's in the science communication (scicomm) space, I've probably done it. Several times.

I have a simple message. Just because lab coats, test tubes, and microscopes are science, that doesn't mean that science is lab coats, test tubes, and microscopes.

I realised several years ago that the scientist stereotype actually deters some children and young people (particularly girls) from getting involved in science or STEM careers more broadly. As a geospatial scientist who works with drones and satellites on the Great Barrier Reef, the stereotype doesn't resonate with me. So I wanted more kids - and the community in general - to realise that there really is a science for everyone - they just need to know where to look.​

But it's not just about what type of science...

Sure, I want people to think of science more broadly, and consider what ignites their own curiosity. But the other part of this is to change perceptions about who does science.

Because along with the test tubes, comes a vision of an older white man with crazy hair. Over the years, I've asked countless audiences to consider what a scientist looks like. Without fail, at least 90% of people I've asked from a range of demographics will describe this stereotype.

So what's the problem with that? There are two parts to this answer. Firstly is that great ideas, creativity, and innovation come from diversity of thought. And diversity of thought comes from diverse people - which is what we need in science to solve a variety of big, hairy, problems. This leads to the second part of the answer, and the commonly used phrase 'see it to be it' is important here. To bring diverse people into science, we need diverse leadership and role models. Not a narrow stereotype.

Women in scicomm

Of course I'm not the only person to realise that we need to change the public face of science if we want to use 100% of our talent pool.

In fact there are many programs now specifically showcasing women in STEM and profiling their work. Here are just a few examples:
  • STEM women
  • Superstars of STEM
  • Homeward Bound
  • Women in STEMM Australia

​Through some of these programs, and others, women have become so good at spruiking their science that we pretty much own the scicomm hashtag on Twitter. There's not many men in sight!

And before you scream #notallmen - I get it. There are some great men in scicomm too. That's not my point. 

My point is that many women are working unpaid overtime (literally) to ensure that other women and girls are able to see it and be it. Why should we have to shout louder and for longer just to gain an equal footing? 

At what cost?

Ah, here it comes again, the unpaid labour that women take on.

Well, here's the cost of my labour.

I am a university academic with a traditional 40/40/20 role. This means that I'm expected to balance my research, teaching, and service / engagement with a split of 40%, 40%, and 20% respectively.

That 20% engagement split is then cut three ways into service to the university, the profession/discipline, and the community. Let's just say they have equal value, so my community engagement can contribute around 7% of my role, give or take. This is about 2.5hrs per week.

At face value, I'll admit that this is pretty reasonable. Tomorrow I have a media call that will take about that amount of time, so that's my quota for the week! I'd best stop writing this blog now...

But then there are other weeks where entire days are taken up with engagement events. 'Celebration' days like International Women's Day are filled with appearance requests - pro bono of course. Because I should be grateful of the 'platform' to promote my message. (BTW, let's flip that one on it's head!)

So beyond my paid labour, there are many hours of unpaid, followed by scrambling to meet my research and teaching requirements. Because it is also abundantly clear that engagement isn't considered in the metrics we're required to hit for promotion.

Did I mention the emotional load of 'being it' just so others can 'see it'?

And what of those who don't have to 'be it'?

While I'm spending my time posing and performing for science, others are writing grant proposals and publications. This is the true currency of academia. And this is what helps career progression through the old fashioned ivory towers.

I've been somewhat lucky (or was that cursed?) to get a significant grant in the past for engagement, and have even converted my activities to a publication. But in a world where not all grant money is considered equal (seriously!) and even publications out of discipline aren't so highly regarded, this is small comfort.

And then comes the inevitable cop out - 'I'm no good at scicomm, it's better if you do it'. News flash, I wasn't born good at it. But naturally we all get better the more that we do, so of course I'm better than many others. This should not be an excuse to load me up. But that's what happens, and the cycle continues.

As for the 'I'm too busy' excuse - this is just like those people who won't empty the dishwasher at work. Hello sunshine, we are all busy. What makes you think that your busy is more important than mine?

​At the beginning of the pandemic in 2020, I hosted an online interactive STEM show with 50 guests over eight weeks for kids around the world who were unable to attend school. I rarely had a woman deny my request to appear on the show, but several men told me that they were too busy. I hope they got their grant.

My biggest concern

All things aside, I absolutely think that scicomm is important - for everyone. And I do enjoy doing it. But after years of prioritising my engagements to promote women in STEM, I wonder if I messed up the balance, and it just may kill my career as an academic. Then I'll become one of the statistics I'm fighting to change.

I worry about the old (rather offensive) saying: 'those who can, do; those who can't, teach'. What if that becomes true for women who are groomed for scicomm? They lose touch with their scientific selves, they don't have time to write grants, and we lose more senior scientists and the value that their diversity of thought brings.

I think we need to fix the system, not the women

Sure, learning to communicate well is always beneficial. But the load of scicomm and 'being it' for others to see it shouldn't rest on the unpaid shoulders of women.

What if...
  • Instead of putting pressure on women to 'be it', we put pressure on media outlets to recognise that women and their science is great as it is. Media outlets should be held accountable to promote the work of diverse science and diverse people.
  • We acknowledge greater diversity in the roles that our academics play and recognise scicomm as equally important as the research we are comming about in the first place. 
  • Everyone is encouraged to shoulder the scicomm load. Please don't make this 'women's work'.

I'd love to hear your 'what ifs' to change the system, not the women.
0 Comments

Forgetting Best Practice in Online Teaching and Learning

22/3/2020

2 Comments

 
Picture
Over the past ten days, I’ve seen a huge rise in the questions and anxiety around online teaching. I’ve been through these feelings before, so I thought I’d put together some questions for you to consider as you move towards making your teaching plan.

I’ve been teaching online since 2010 as an academic at Charles Darwin University in Australia. I was thrown into the deep end when I first started, having never before even undertaken an online course as a student. Over the past ten years I have refined my resources, but by no means have I reached perfection! It’s also been rather tough along the way, particularly in the beginning.

When I first started, many people thought that simply uploading a PDF of a reading or lecture notes was sufficient to be called ‘online learning’.

Let me say that I don’t think this is sufficient. Under ‘normal’ conditions. But I’m not considering ‘normal’ or what is actually best practice in this blog.

Those more ‘advanced’ thought that it was ok to just video record a lecture (e.g. camera at the back of the room) and make that recording available. No camera or microphone hardware was available, so I used my own in the first instance.

These recordings are not fabulous, and I wouldn’t recommend this unless you have professional videographers cutting multiple angles etc. 

However, in light of the current situation, if this is the best that you can do, THAT’S OK!!!

Again, this is not a blog about best practice. It’s about doing the best that you can.

I am really concerned about setting expectations too high and putting unnecessary stress on teaching staff. It has taken me years to develop my resources (http://kejoyce.com/education), so please don’t think that you have to achieve this within a week! Cut yourself some slack, and work out what you need to do to meet your learning outcomes within your current capacity.

I designed the following questions considering tertiary education, but you can easily use it as a school teacher as well. Note that many of my comments here are specific to this unexpected need for getting online learning up and running quickly (thanks for that COVID19!). Creating content for courses designed for long term ‘flashy’ online learning is a different story.

PART 1: Understanding your current class/es
Answering these questions will help remind you of the current scope for your classes – ultimately it’s about making sure you don’t attempt to do something that will require more hours in the day than what you can reasonably allocate.
  1. How many classes do you teach?
  2. How many students in each class?
  3. What is the current mode of teaching (e.g. 1 x 2hr lecture, 1 x 2hr prac…)? What sort of practical activity (if any) required? 
  4. What are the current assessment items? Can you reduce them – this will reduce your grading time, which you can then use in other preparation areas.
  5. Is there any group work? Is that critical? Btw, videos are great assessment items - groups can do this too. Many job applications now require videos as well as written CVs, so this is a great skill to learn.
  6. Do you have any students with disabilities? What extra support might they need?
  7. Do you know if all your students have a computer with internet? That's not shared with their three kids now at home thx to school closures? Will it matter if it's a Mac or PC (e.g. specific software requirements).
  8. How many hours per week do you currently spend on each class, and what’s the breakdown? This should guide how much time you spend on the online class as well – obviously you will have other commitments that can’t be shirked.
    1. Prep
    2. Actual teaching
    3. Grading
    4. Office hours
  9. Will you also have a care-giving role at home? Factor this in to the amount of time you have to create resources. It’s hard enough as it is creating online materials, but dealing with children at the same time is particularly trying. They need and deserve your attention too!
  
PART 2: Understanding your capability / capacity
Answering these questions will help remind you of your own skills (and limitations) and what you are able to achieve. Start with what you know and don’t try to learn ten new software packages at once!
  1. What experience do you have with online teaching or creating resources? If nothing, start simple!
  2. Do you have a YouTube or Vimeo Channel? These are good options for hosting recorded materials and stream faster than getting students to download videos. YouTube is free, but is a lot more open in terms of who can see your videos and suggesting other (distracting?) videos to your students.
  3. Do you know how to use Zoom or a similar online conferencing tool? Zoom is awesome and stable. If you use something else, then stick with what you know. If you know nothing, try Zoom :)
  4. Do you have decent internet at home? If you need to stream lectures or even upload to online learning repositories, will you be able to do this?
 
PART 3: Understanding what you’d like to do
  1. Synchronous (real time) or asynchronous? If you plan to do asynchronous teaching, create short videos (10-15 mins max). Don’t beat yourself up over editing and perfection here at this point in time. If you are recording synchronous, or have access to previous years’ recordings, just leave them as the full recording for the moment – chopping them up is not a priority when you have so many other things to do.
  2. Curriculum based or problem based learning? Curriculum based will require you to create more resources ‘up front’, while PBL or student led learning will allow you to do less spoon feeding and be around more in a support role.
  3. Open and shared resources or private and locked? Do you have any privacy concerns around the content you create? Ten years ago I kept my videos locked up for my class, then I changed to YouTube around the time when #OpenData started becoming a thing. Now I give away everything that I can. I can write a whole separate blog on the benefits of this. But either way, your choice will affect the platform you choose for your learning materials, particularly video. I found it so painful to host content within the BlackBoard learning management system that I just use it for the shell now (and for assessments), but definitely not for my videos or learning resources
  4. Do you need to provide tuition around practical skills? This is where my YouTube videos have been a huge help for me. It’s awesome to be able to demonstrate an activity using screen capture software. I previously used Adobe Captivate for this but unfortunately my University no longer has this license, so I now use MediaSite. It’s not great, but it does the job. Screencastomatic is awesome too. 
PART 4: My Recommendations
  1. Set up a discussion board and refuse to answer any non-confidential questions via email – sounds rude, but will save your sanity as your inbox will otherwise overflow. This will also encourage students to help each other out (encourage this!) and will avoid you having to answer the same question multiple times. You can moderate answers that the students give each other, but resist the urge to answer every question yourself otherwise they won’t step up to the task themselves.
  2. Offer office hours (Zoom) by appointment – you can set up a google spreadsheet where students sign in for select blocks – perhaps 15 minute blocks? Screensharing in Zoom is awesome so students can show you what they are having trouble with if its software related.
  3. Have a site where you can store your recordings – e.g. Vimeo or YouTube. This might depend on if you want to keep things private or not
  4. If you create videos yourself, don’t watch them back. This is painful! Unless you know you’ve made a mistake that needs to be edited out, deal with the fact that you won’t be perfect, and there’s always room for improvement – next year!
  5. If you are recording videos, practice your ‘phone voice’ J You know, that super polite one you use when you answer the phone? The more you can keep this up during your video, the better J
  6. Cut yourself some slack! Did I say that already? Don’t compare what you create to any of the online training that you may have previously done where the budget was huge and they had a team of people doing the work. Your job is to make sure your students are able to meet the learning objectives – even if you’ve had to modify them.

​My final thought – with bars, clubs, sporting venues, pretty much everything closed, will we actually see an increase in student participation, resulting in better learning outcomes??
2 Comments

Sparking Curiosity for Mapping

8/12/2018

0 Comments

 
Picture
I have been working with satellite images for about 20 years to map and monitor the environment. In the past five years I’ve branched into working with drones for the same purpose, but with greater detail. Over this time, the advances that I’ve seen in drone technology for mapping have been phenomenal. This ranges from the software used to plan missions, through to platform capability in terms of flight time and payload capacity, and of course the camera and sensor systems able to capture the data that I am seeking.

When I first started flying drones, I never imagined that I would soon be teaching thousands of school children around the country to do the same! Now I’m on a mission to show just how cool geospatial technology is to as many people who will listen. And this starts with the very youngest students in our schools.

My drone day teaser program (see www.shemaps.com) introduces students and their teachers to drone technology through a scenario based on ‘a day in the life of a geospatial scientist’. Students learn the basics of safety, flight, and mission planning using minidrones – all within a school gymnasium. But most schools instantly want more. They want to step up to using a ‘real’ drone to map a ‘real’ environment. So I’ve been investigating the next steps for budget conscious schools.
Picture
Students at Emerald State School learn the basics of coding their drones for an aerial survey mission
Picture
The drone is capturing photos as it flies according to the students' plans
Many drones are now capable of performing basic mapping functions. Here I have focused on investigating the DJI Spark, as it is the smallest (and cheapest) drone within the popular DJI range that has an onboard GNSS (Global Navigation Satellite System). As an aside, most people refer to this as GPS, however it also includes GLONASS – the Russian satellite navigation system – among others.

Back to my question – can the Spark be used for mapping? I’d have to say a little bit of yes with a whole lot of ‘but…’

Firstly I guess it’s probably useful to define ‘mapping’. I'm not going to go all purist here, but instead look at mapping in its most basic form - being able to collect data (photos in this case) that can be used to determine and analyse the location of features, patterns, or processes in the environment.

Here’s the thing. The Spark is a great option for schools wanting to take the step up from mini drones. It’s small, easy to fly, and has a reasonable camera (12MP) for the price point. But the huge downside is that it hasn’t been integrated into the commonly used mapping mission planning apps! So you simply cannot plan a gridded aerial survey mission to be flown autonomously. Pix4D capture was the only mapping app that would even recognize my Spark, yet it’s not possible to set any critical parameters such as overlap or even flying height. It can be set to take a photo at a given distance interval, but from then on, the pilot has to manually fly the mission. Perhaps this is not too bad for students to be practicing their manual flight, though it is difficult to maintain consistent speed and overlap.

Despite the challenge of manually flying straight lines as my first workaround, I managed to cover my trial survey area and capture enough photos to create an orthomosaic. But here is where I ran into perhaps my bigger challenge. The geotags on the photos are imprecise.

What does this actually mean? Let’s not be confused by accuracy – that’s a separate matter. Precision in this instance relates to the number of decimal points contained within the geotag or locational information. Imagine this – if someone asks where Australia is located, you could say ‘the southern hemisphere’, and that would be accurate. But it’s not precise enough to pinpoint its exact location. The same goes for the Spark coordinates. They are precise to four decimal places, but that’s not enough to separate them out from each other, so effectively it looks like all photos have been taken at the same spot.
Picture
The impact of this is that software packages designed to create orthomosaics from drone data will get very confused when trying to spatially locate the input data. Incidentally, I don’t think that it’s a problem with the onboard GPS, just in the way the coordinates are recorded within the EXIF file associated with the image. So presumably it could be fixed with a software update if DJI so desired.

Luckily there is another workaround (we’re up to number two now). You can actually tell the software to ignore ALL coordinates. It will then create an orthomosaic purely on determining photo overlaps – this gives a better result than having imprecise locations. BUT the output file will not have any geographic coordinates, that is, it won’t know where it is located on the surface of the earth.

Cue workaround number three – you now need to bring the orthomosaic into a GIS software package and georeference it according to another base data set.

So, technically yes, it is possible to use the Spark for mapping, but it’s really not that convenient! And I suspect that if you are buying the Spark as a beginner drone, then these workarounds may not be in your portfolio of skills :)

Perhaps you think that your area of interest (perhaps your school grounds) is small enough to fit within a single photo, so you don’t need to worry about mosaicking or stitching together multiple photos? This is all good if you just want a pretty picture. But if you would like to be able to make measurements or know the exact location of something, this isn’t a good option. This is because the further away something is from the centre of the photo, the more distorted it becomes (for more information on radial displacement, check out http://rscal.maitec.com.au/API/index.html). An orthomosaic corrects for this distortion by effectively using only the centre part of many overlapping photos.​
Picture
Notice how the trees and building towards the edge of the picture appear to be leaning outwards. The top of the feature no longer aligns with the bottom. This is not an issue at the centre of the image. Radial displacement also increases with increasing height of a feature.
I want to make the point that I am not addressing camera quality here. I do believe that you get what you pay for, so the camera on the Spark is capable of capturing aerial imagery, but the quality is not as good as that of a more expensive option.

If the Spark is not for you, where to from here? I've compiled a list of a few of the other small (<2kg) drones that you might like to consider. Refer to their websites for a full cross comparison - I've only focused on the specifications that I deem to be most appropriate to mapping capabilities.
Picture
0 Comments

Diversity Through the Eyes of Chocolate

28/10/2018

0 Comments

 
Picture
Venus' chocolate bars were the best in the galaxy! Illustrated by Hamish Mead
I talk to a lot of people about diversity in the workplace, schools, and in teams more generally. I believe (and the research supports this) that diverse teams are more successful, so this is something that we need to embrace, not resist. Yet a common objection I hear is along the lines of 'I have nothing against diversity, but (there's always a but...) I just want the best person for the job!'

My question in response is 'how do you define 'the best person'?

The term 'the best' suggests that there will only ever be one person who fits that criteria. And of course we all want the best. But what if my version of the best is different from yours? Let me use an analogy of a netball team as this is something I'm very familiar with.

My netball team needs a new GS. One version of 'the best' person might be person A who has a 100% shooting average. You can't win a game if the goals don't go in, right? But what about person B who shoots at 90%, but also brings great leadership skills and can also play GK. Is person B lowering the teams' standards, or are they bringing an offering that may in fact be more valuable?

To have a look from a different point of view, I wrote the following little number inspired by a real life true story. Exaggerated and characters changed of course :)

Venus was one of the biggest and most well known chocolate companies in the galaxy. Their chocolate bars were extremely popular, and the time came to bring a new chocolate into their team.

The big boss team from Venus were excited to conduct interviews with suitable candidates. They were looking for a chocolate with high quality cocoa and the right balance of sugar. But they also wanted something a bit different and special to bring a new flavor to their team.

As the first chocolate candidate waltzed through the door, the team was impressed. Silky had exemplary cocoa references and was sweet to perfection. But the team felt that she was too similar to the rest of their chocolates. She certainly met their high standards, but would she add anything new?

The second candidate Zappy was equally well qualified. His cocoa levels exceeded requirements and his sweetness was in the Goldilocks zone. He was hard to fault and already looked very similar to the other chocolates, so the team was sure he would fit in well. But again, was he just a little too similar?

When the third candidate rustled into the room, the team was taken aback. Knobbly certainly looked very different to the rest of the chocolates. Their cocoa levels were lower than required, and the team wasn’t sure about the sugar balance either. Clearly Knobbly would drop their standards.

But Knobbly wasn’t going to be discarded so easily. They knew that the team was looking for something different, and they had a trick in their packet. For Knobbly wasn’t even a chocolate – she was pet food!

Knobbly convinced the team to diversify their ideas. To think outside the box. And to realise that embracing diversity wasn’t about lowering standards, but about reaching new heights in different areas.
​
Venus became one of the largest and most successful manufacturing companies in the galaxy. 
0 Comments

Who's Truth is the Truth?

3/10/2018

0 Comments

 
Picture
I have to say that I love testing new scientific toys. My latest acquisition is a set of Propeller Aeropoints. This is a set of ten foam targets with embedded GNSS that we place out in an area of interest before conducting a drone mapping mission. Why? Although my drones have onboard GNSS units, they are not always very accurate. This can make it difficult to know the exact location of a feature, and particularly challenging when trying to line up images to investigate changes over time. The aeropoints log their X,Y,Z location, and this can be used to correctly align a drone image mosaic.

Each Aeropoint is 0.5 x 0.5 m in size and despite being foam, it is a little heavier than expected, especially when impersonating a packhorse (does this make it ‘imanimalating’?) and carrying all ten. However, the weight is important as well so that they don’t blow away. Which they certainly don’t. Their low profile also ensures that they don’t move once set in place. Unless maybe in major winds, but in that case I wouldn’t be flying anyway. As for the size – well they need to be clearly visible in the imagery so they couldn’t be too much smaller either.

Pretty much all you need to do is spread out the targets around the survey area, turning them on as you go. They need to log for at least 45 minutes to get a good position fix, so it’s important to do this before having a cup of tea and setting up the drone. Simply fly the mission when ready, and collect the targets when done! As you collect each one, it will attempt to upload its data via your mobile device. If you’re not within internet range it will continue to try to connect until it’s successful. It can then take supposedly up to 24hrs to process the location data, but in the trials I have run, they were completed and available almost immediately.

Perhaps my favourite design feature about the Aeropoints is that they are solar powered. It’s a thumbs up for the environment and just one less set of batteries that I need to charge – I have enough of that to do with all of my drone equipment and other field sensors! So this is a really nice touch.
PictureAeropoints coverage in Australia
My least favourite aspect of this technology is the limited coverage of the correction network. Certainly much of SE Australia is well covered, but with red dots depicting coverage areas, the rest of the country looks like it has measles. I emailed to ask them about this and received the response “We are continuously expanding and increasing the coverage of our network; and, yes, your feedback and suggestions on prospect areas to focus on would be much appreciated.” So hopefully this improves over time.
​


Another note on their customer service while I’m at it. One of my Aeropoints was a dud, right out of the box. After checking a couple of things with them they quickly arranged a replacement, which arrived a couple of days later. Very easy.
​

In terms of actual performance, we compared the X,Y,Z values retrieved from the Aeropoints with those obtained by a local surveyor and achieved very pleasing results. I don’t know the system that the surveyor was using – I’m waiting to hear back from them and will update when I find out. The clear 1:1 relationship between the two sets of observations was honestly better than I expected. 
Picture
Comparison of Surveyor data and Aeropoints for Eastings, Northings, and Elevation
PictureMost pairings between Surveyor and Aeropoints have a difference of less than 2.5 cm. Note the discontinuity in the x axis to account for the points with larger discrepancy
Out of the total number of 30 observations (X,Y,Z for each of ten targets), 27 had an absolute value difference of less than 2.5cm between the measurements of the Aeropoints and the Surveyor. The biggest problem was that Target 8 had a 2m discrepancy in elevation. But noting that the surveyors data were recorded by hand, I have to wonder if this is an error in transcription given the close alignment of all other points. But otherwise how do we know who's truth is the truth?

All in all, I'm pretty impressed with the Aeropoints and their ease of use. Given that my favourite field locations are out on the Great Barrier Reef, they will have limited immediate use for me as the correction network doesn't cover my sites, and of course the GNSS doesn't work underwater. Wouldn't that be awesome if it did!

Thanks to Tom Watson from Droner for collecting the data to support this.
0 Comments

Book Review: Six-Word Lessons for Drone Pilots and Outdoor Enthusiasts: 100 Lessons to Make Drone Flights Safe, Ethical and Green for Wildlife and Humans - Alicia Amerson

26/9/2018

1 Comment

 
Picture
As with many fabulous pieces of advice, it’s not rocket science. BUT it takes considerable skill to bring these little pearls of wisdom from the periphery of our consciousness to front and center in our mind. And that’s something that Alicia Amerson has done particularly well in her latest book ‘Six-word lessons for Drone Pilots and Outdoor Enthusiasts: 100 Lessons to Make Drone Flights Safe, Ethical, and Green for Wildlife and Humans’.

This book is part of the ‘Six-Word Lessons’ series of books. I confess to not knowing anything about this style prior to reading her book, but it certainly makes for easy reading – even in a single sitting. The book is divided into chapters that are all named with six words. Each of her 100 lessons is also entitled with six words, followed by a short paragraph description.

The crux of the book is that we all have a shared responsibility to care for our environment and those that live in it. She explores this through understanding the positive and negative impacts that drones and their operations can have, with a particular flavor of wildlife protection. Alicia’s research and experience as a marine biologist and drone pilot make her an authoritative source on the potential impacts our behavior causes, and ways in which to mitigate those impacts.

One thing that has stood out in my mind is that while you may not perceive an animal’s behavior to change, that doesn’t mean that a drone hasn’t distressed it. The example she gives is of a bear whose heart rate increased 400% in response to a nearby drone, despite showing no other visible signs of stress. She also points out that it is not only the drone noise, but the shadow and silhouette that need to be considered.

Now I work a lot on coral reefs and I have heard others say ‘don’t worry about the drone, boats are far more disruptive’. And they may well be, but I also don’t believe that we should say ‘don’t worry about cigarettes, ice is way worse’. I think that we should worry about both. And that’s not to say that drones shouldn’t be flown, but just that we should take care to do so respectfully. The power is in our hands to reduce our impacts.

Alicia’s book is filled with common sense reminders, and little gems about animal behavior. I love her ideas for ‘greening your drone footprint’, and I’m super impressed by the wealth of knowledge she has managed to distil into such a simple format. I highly recommend this as required reading for anyone flying drones in our great outdoors. 
1 Comment

Reef Time Droning on the Great Barrier Reef!

7/2/2017

2 Comments

 
Picture
My first mission with Casper. In the background you can see Cooktown
​After a week of balancing tides, cloud cover, water clarity, sun angle, wind, and swell, Notus the Greek God of the South Wind finally got the better of us. We can’t complain, having lost only 2.5 days out of a 10 day trip in the completely exposed northern Great Barrier Reef during cyclone season. I think we’ve been incredibly lucky. Nonetheless, I still feel like I am on the steep part of the learning curve when it comes to flying drones despite dabbling for the past couple of years. This current field trip brought new challenges, the most notable being having to launch and recover from the roof of our boat.
PictureSun safe droning has us looking like grannies in the field :)
With technology changing so rapidly, I find myself flying with a different configuration of drone / sensor / flight controller / ground station software each trip. For this particular trip I had to put aside my larger drones due to the small area for take-off and landing. Previously I have opted for the 3DR Solo if I wanted to fly in the sub 2kg category, but with a rocking boat underfoot, I knew that Betty and Shmoo wouldn’t be happy. This instability didn’t seem to bother Casper, my DJI Phantom 4 Pro, which also has the added benefit of the landing gear shaped like handles for the optional ‘catch’ if required.
 
In all honesty, I didn’t want to resort to catching. Something about soft skin around spinning propellers doesn’t make me comfortable. I’ve seen the YouTube video where the Phantom is used as a very efficient blender. Granted I think the props may have been changed for carbon fibre rather than plastic, but still.

My alternative was to purchase the WaterStrider. Not that I intended to use this to land on the water, but I thought it would help out when landing on the boat’s unstable surface. I feel like the Phantom can tip quite easily on landing so I wanted to help it out. My first impressions of the Strider were that it was larger than I thought, and the floating pads looked GPS receivers. My second and final impression was that it is a good idea, but certainly poor execution.

Picture
The Waterstrider - Can't recommend it...
As soon as Casper rose into the air with the Strider, I could tell that it was not going to be good. Casper struggled to stay balanced as the breeze caught the floats. He jerked and wobbled mid-air in a concerning manner. I brought him back to land immediately, and at least he didn’t tip. One of the rear motors was too hot to touch while the others were also rather warm. This was uncharacteristic of the craft so I knew it had been working hard in its short flight that can't have been longer than 2-3 minutes. This also suggested that it may have been unbalanced, so I checked the attachments and made a minor amendment.
​
I decided to have another try. I pushed Casper a little higher this time to increasingly worrying effect. This is clearly not a useful aid for me! The wind was less than 10kt and represented ‘normal’ conditions on the reef. Perhaps it performs better with no wind at all, but that is unrealistic in the marine environment for which I understand it has been designed. So back to the bare legged Casper. Sorry that I don’t have a video to share of this, but there is no way I want to re-enact it for you!


One bonus of the timing of this particular trip was that DJI released a new (free) flight planning app about two weeks ago – DJI GS Pro. It is a massive improvement on Litchi, which is the app that others had recommended I purchase. For survey purposes, I quickly found out that Litchi was near useless but I guess it was the best available for programming Phantoms. All my other drones fly with the pixhawk flight controller so I am used to programming with Tower (Android App) and Mission Planner (desktop), so I found the Phantom options seriously lacking. Having said that, the GS Pro app does a pretty good job and I think will only improve in the future. Here’s some of what we learned:
  • A mission angle of 0deg means that the craft will always face easterly during the flight. It will fly forwards and backwards to keep it’s angle. At 180deg it will face west, and at 90deg it will face north. There is a bug such that it is not possible to fly at an angle anywhere between 270deg and 360deg. It is therefore not possible to fly with the drone and camera facing in a SE direction.
  • To get the best mosaics, try to keep the survey to a square or rectangle shape, and make sure you have at least four runs.
  • To minimise sunglint, fly between NW and SW in the morning, and between NE and SE in the afternoon. Except of course you can't fly SE at the moment using GS Pro... Choose whichever angle is most efficient between these brackets.
  • Unless it is overcast, tilting the camera to about 15deg off nadir (while flying with your back end to the sun) significantly reduces glint. Make this angle even more oblique closer to midday. You can change the angle mid-flight to keep the glint away from the center of the image.

Things that need to be fixed in the app that I'll send to DJI :)
  • Need to be able to type values in the different parameter fields rather than just using a slider bar. It was super hard to get the slider in exactly the right spot. A difference of just one degree in the flight angle could result in a whole extra minutes’ worth of flight.
  • Add the ability to upload GPS or shapefile data to define mapping areas
  • Fix the angles of flight between 270o and 360o
  • Have an arrow on the flight lines when planning to show which way the craft will be facing
  • Have an ‘undo’ button
  • When sending the mission to the craft, minimise this information screen so it’s possible to see the map view behind. This would allow the pilot to manually fly to the start point of the survey, which is far more time efficient than flying at the survey pace.
  • Every now and then it would stop taking photos during a survey for no apparent reason
  • Time taken to upload the mission to the craft is variable. Sometimes it times out and the app needs to be closed and re-started
  • Ability to flip which end the survey starts/finishes at
  • Ability to switch to video
  • Upon mission completion, it was curious that when pressing the photo button on the remote controller, the craft would continue to take photos at a regular time interval all the way home. This was actually kind of useful even though it felt like a bug
  • At the end of the mission, the map, camera view, and telemetry should still be visible and updating – was otherwise having to pause the mission just before the end of the flight to keep this information on screen.
  • Ability to visualise multiple flight plans at a time so it's possible to see if the areas overlap
  • No auto zoom to the flight path
  • Show gimbal angle with telemetry within the app
  • Clearer scale bar - this was super hard to see over the imagery
  • Better imagery and/or ability to upload your own
  • Keep the blue bounding box of the survey area completely transparent
  • Use the term landscape or portrait when referring to image capture orientation rather than parallel or perpendicular to flight path

After this trip I finally got around to creating a gallery of some of the cool shots I have been lucky to capture since I started flying drones. Please check it out, and let me know what you think! Each picture has a science mission behind it, rather than being a carefully planned and framed image. One day I might get to writing and sharing their stories.
 
In all, we visited nine of the 3,000 odd reefs in the Great Barrier Reef. We'll be looking to combine our drone imagery with in-water snorkel and dive surveys and satellite imagery to create a map of the different reef habitats in the region. Thank you to Dr Chris Roelfsema and the team at University of Queensland for planning this trip and inviting me to be a part of the research. To the Great Barrier Reef Foundation for providing the funding. And to Dr Stephanie Duce who was a fantastic helper and #SheFlies new recruit for this trip!
Picture
The Kalinda at Ellison Reef
2 Comments

Flirting with FLIR

7/5/2016

8 Comments

 
Picture
For some time I've been fascinated by the marked temperature differences over short distances I can feel when swimming at the beach or on the reef. This clearly happens at scales that are far too small to be detected by satellite imaging sensors. As I'm also interested in coral reef dynamics, I am curious to know just how these fine scale variations may play a part in affecting coral health. Temperature loggers are one way to look at this, but they are always going to represent discrete points compared to an imaging sensor that can measure a continuous surface. An airborne thermal imaging sensor is therefore the only way that I can start to investigate this matter.

Recently, a couple of miniaturised thermal sensors have come onto the market and are light enough to be carried by off-the-shelf drones. I've been dabbling with drones for a couple of years now, so it seemed the right time to see where I could take this. Last week I had the opportunity to test the FLIR Vue Pro on Orpheus Island, Great Barrier Reef, and here's what I found.

Firstly, here's my equipment:
  • 3DR Solo (see also my thoughts about my first Solo flight)
  • FLIR Vue Pro 19 mm lens, 640 x 512 pixel array, 'slow' speed thanks to Tim Snell from IMC
  • GoPro Hero 4 Silver modified with 4.35 mm minimal distortion
  • Go Pro Dual Mount
  • Rugged Troll Thermal loggers
  • FLIR Vue Pro App (for android or iOS)
  • USB power pack

Power supply
The first thing to note is that the FVP does not come with a power supply or battery, just a mini USB input cable. So obviously to use it, you need to have a way to power it. Mains power is clearly restrictive, but is fine for getting familiar with the camera. For a mobile option, I bought a USB power pack ($30). At 80 grams, this could be attached to the drone, but it's still a lot of unnecessary weight. Luckily the 3DR Solo has an accessory bay that's built for exactly this sort of thing. For the lighter option of 65g, a colleague made me a mini USB connector that also includes navigation lights for the Solo (it's severely lacking in this regard, and I plan to fly at night). We have some work to do in giving this some finesse especially as we weren't sure how long the USB cable needed, but at least we now have power to the camera.

Attachment / Mounting
How to mount the camera was the next main decision. It comes with a GoPro attachment ring / collar that fits under the lens. This is fine if you want to mount it on the Solo facing forward, but for mapping purposes it doesn't provide enough clearance from the hull. I opted instead to use a tripod-to-GoPro adaptor which then allowed the necessary clearance. Unfortunately when every gram counts I'd rather not have this added weight, but short of building a specific mount with not enough time, this will do the job.

Next I wanted to see if I could fly both the GoPro and the FVP at the same time. To do this, I bought a dual mount and fitted the GoPro to the front of the craft while the slightly heavier FVP was closer to the centre of gravity. Taking care to use the shortest GoPro connector screws possible, this complete set up (including lights) weighed 1.84kg, just 20g more than the standard gimbal + GoPro configuration. This is still within the expected MTOW of the craft. I can fly this set up in the hot and humid tropics for approximately 12 mins, while retaining at least 20% battery at the end of the flight.

Picture
Picture
Controlling the camera
With the hardware largely figured out, software was the next challenge. The FVP App is pretty basic to be honest, but it largely does the job. I was having some troubles with it initially, but an update came out last week that largely solved the issues. I learnt to just ignore its warnings.

Within the App, it's possible to change colour palettes, dynamic range, and output format (jpg or tiff). I use the white hot palette as I'm not concerned about the display, I just want the actual data in the pixels. I can always display it as different colours later if I wish. The app is used to switch between video, image, or time lapse modes. Images can be set to acquire as frequently as 1/sec up to 1/17 secs. Data are written to the 32GB included mini sd card in the camera.

The biggest miss on the app is that there is no live feed of the imagery. This is a real pain when trying to work through the different settings - without the immediate feedback of the effect of a setting change, it's like learning old school photography again and having to wait until your film is developed before you can see the results. There is the facility for a mavlink cable (provided), so a feed should be possible via the drone itself though I didn't test this out as its not a simple plug in.

The App uses bluetooth to connect to the FVP. Once you have the recording started, you can manually switch the blue tooth off. Alternatively, I do like how the Bluetooth automatically disables itself after two minutes of the App being closed so that it cannot otherwise interfere with the flight controller. Yet even with the App closed, the FVP continues to record data and you can see this by a small flashing light on the camera itself.

if you're intending on using Tower or Mission Planner to set up your flights, it's useful to add the FVP camera specs into the software so that footprints and overlaps can be accurately determined. To do this have a look at these instructions, but use the following parameters (note that you will have to change this if you have the smaller format frame):
<Camera>
<name>FLIR Vue Pro 19mm</name>
<flen>19</flen>
<imgh>512</imgh>
<imgw>640</imgw>
<senh>8.7</senh>
<senw>10.88</senw>
</Camera> 

Working with the data
Downloading the data is super easy. Simply get a mini SD card adapter and plug it into your computer. My files were all 643KB ea. But that's when things got a little more challenging. I wanted to geotag each image based on the Solo telemetry data. This is usually pretty simple in Mission Planner - at least for my GoPro data. But MP couldn't match the image acquisition times with the GPS data. I suspect it is something to do with the format, as the time stamp on each of the TIFFs looked fine to me. I had to assume that it was auto-syncing with the tablet that I used to control it as I couldn't find a way to otherwise change it. I then tried again to geotag with Geosetter, and that worked so clearly there's nothing wrong with the files, but something wrong with Mission Planner reading their metadata. I also realised that each image actually HAD a geotag initially, but that it was set at 0,0 lat/long. That totally messed up our attempt to mosaic in Photoscan without fixing that first.

Given that the imagery I acquired is not the standard type that Pix4D or Photoscan can easily mosaic (i.e. it's hard to automatically find control points over water) we are certainly having some challenges there. Once I've sorted it all out, I'll post a blog specifically on that.

In the meantime, I am happy that the camera is sensitive to what I need. Early views of the data are really promising!

Calibrating for absolute temperatures
The top of the range FVP is radiometrically calibrated. The one that I received was radiometrically capable but not yet calibrated. Quite a bit cheaper... For many applications, relative temperatures may be just fine, but I wanted absolute. And as I have a fully calibrated FLIR A65, and access to temperature loggers, I performed my own calibration. I used a couple of Chinese takeaway containers filled with iced water, boiling water, and something in between, all inside a black box tucked inside a storage cupboard - somewhat similar to Harry Potter's bedroom - with the lights out. The FLIR sensors are sensitive to reflected light in the 8-14um range as well, so I wanted to get rid of that and only have the emitted temperatures. I used FLIR Tools for the A65 (below) and took photos of the same area with the FVP using the App. I still have to model the correction - another post again!

Picture
8 Comments

Dear Student...

17/4/2016

0 Comments

 
Studying is tough, I get that. I've been there, and I don't envy you! I felt nervous as I watched you walk into the exam room - I'm sure you felt much worse though. But you'll be relieved after two hours - it's then that my pain begins!

I receive your exams with a mixture of anticipation and dread. Your assessment items are the ultimate feedback on my performance. I look at what you write, and I take it personally. Did I neglect to teach you something, or could I have explained a concept better?  I share your wish to succeed.

So let's work together. Here's some things that you can do for me:
  • If you really don't know an answer, please don't make me read through waffle. Spend your time enhancing the answers you actually have something to say about;
  • Read (and answer!) all parts of the question - highlighters are great for helping with this;
  • Address the question - it doesn't matter how good your answer is if it doesn't meet the brief;
  • When I offer you the opportunity to discuss your work before it's due, please take me up on this;
  • Different coloured pens are a great asset;
  • Figures, diagrams, tables are a fabulous way of not having to write heaps of text (and I thank you for this simplicity;
  • There is absolutely no need to repeat the question in your answer - just tell me the answer and how you got there;
  • Please don't write in pencil;
  • Keep white space in your writing - i.e. leave a spare line between questions and paragraphs;
  • If the question says that dot points are fine, please use them;
  • If you already know that your handwriting is hard to read, at least try to make it bigger;
  • Quality, not quantity! From the good Dr Suess: 'The writer who breeds more words than he needs is making a chore for the reader who reads'; an
  • Far better to do something simple, and do it well, than to attempt to save the world and accomplish nothing.

Good luck with your assessments!
0 Comments
<<Previous

    Karen Joyce

    I'm a remote sensing scientist with a keen interest in research and active learning

    Enter your email address:

    Delivered by FeedBurner

    Archives

    March 2022
    February 2022
    March 2020
    December 2018
    October 2018
    September 2018
    February 2017
    May 2016
    April 2016
    December 2015
    November 2015
    October 2015
    August 2015
    July 2015
    May 2015
    April 2015
    March 2015

    Categories

    All

    RSS Feed

Powered by Create your own unique website with customizable templates.